SSH Usage on CEP
We use the Secure Shell (ssh) on CEP to connect to different systems. This page explains how this can be used without having to supply a password each time you want to connect to a system. The image below tries to explain the process:
With normal ssh you always have to give a password. If you use a private and public key, you can access systems where your public key is in $HOME/.ssh/authorized_keys from the system where you have the private key. With the ssh-agent explained below, you can ssh to any system without having to supply a password. (very useful to run things on nodes of a cluster, or other remote machines.

Generating keys
Linux or OS X
The first thing you need to do is generate an authorisation key using the RSA algorithm (please don't use DSA as it is insecure), which means you need to do the following once. You need to have a somewhat recent version of OpenSSL on your system for this to work:
ssh-keygen -t rsa
cp .ssh/id_rsa.pub .ssh/authorized_keys
Use cat or some editor like vi, kate or emacs if authorized keys already exists and can't be simply copied. Copy your .ssh/authorized_keys to the $HOME/.ssh directory of each system you want access to. Please make sure you use a passphrase to encrypt your private key, to prevent easy access. When using the instructions below on the ssh-agent, you'll only have to provide it once each time you use the systems. You only need to generate one key-pair on your personal machine! You can also use cut and paste to simply copy your public key to all target systems. Don't let you editor use word-wrap, since the key must be one single line.
Windows
Windows users can download the Putty toolkit from http://www.chiark.greenend.org.uk/~sgtatham/putty/download.html. Please select the Windows Installer as that contains the whole package.
After installing, you'll have the Putty program, and several help programs such as Pageant.
Select from the Programs menu the Putty section and select PuttyGen.
- Select in the
Parameterssection the key type'SSH-2 RSA' and number of bits 2048. - Press the
Generatebutton. - Now you'll have to move your mouse over the grey area below the progress bar.
- Once done, you'll get a screen like the one shown below.
- Enter a passphrase (and confirm).
- Now you can copy and paste (with the mouse!) the public key into the
authorized_keysfile on your destination system. Make sure that the whole key (starting with ssh-dss and ending with the key name) is in one line without line feeds.

Using an SSH-Agent
An ssh-agent is a small program that when you start work is used to unlock the passphrase protected private key you generated above. The ssh-agent will from that point on automatically supply the right answers to any ssh session, if you use ssh -A each time you connect to another system.
Detailed information on how to setup ssh agent forwarding can be found here and here.
Linux
The ssh-agent runs in the user's local PC, laptop, or terminal. Authentication data need not be stored on any other machine, and authentication passphrases never go over the network. Also, the connection to the agent is forwarded over SSH remote logins, and the user can thus use the privileges given by the identities anywhere in the network in a secure way.
If you start the ssh-agent it creates a socket in /tmp and then generates a few commands on stdout which serve to set environmental variables and to tell you which PID the agent has. An example:
SSH_AUTH_SOCK=/tmp/ssh-jpIaV4861/agent.4861; export SSH_AUTH_SOCK;
SSH_AGENT_PID=4862; export SSH_AGENT_PID;
echo Agent pid 4862;
By 'eval'uating this code, the variables SSH_AUTH_SOCK and SSH_AGENT_PID will be set. You can use the SSH_AGENT_PID, for example, to kill the agent when you log off. The agent itself recognises the variable and commits suicide when you type:
ssh-agent -k
The SSH_AUTH_SOCK variable is mainly used by the program ssh-add, which uses it to determine with which agent to communicate. To get your agent running in (t)csh type:
eval `ssh-agent`
ssh-add
Please note the back-quotes. If you have bash, you might use the more readable:
eval $(ssh-agent)
ssh-add
Starting ssh-agent at beginning of X session
When using a Linux workstation, it is more convenient to start the SSH agent when logging into your X session, than to start it in one or more pseudo-consoles. To do so, you must add the following lines to your .xinitrc file in your home directory.
eval `ssh-agent -s`
if test -S "$SSH_AUTH_SOCK" -a -x "$SSH_ASKPASS"; then
    ssh-add < /dev/null
fi
This will start the SSH agent directly after logging into your X session. It will then ask you to enter the passphrase. After that, you will be logged in as usual.
Note: If you don't have an .xinitrc file, you must create it. On openSUSE you can copy the skeleton file /etc/skel/.xinitrc.template to ~/.xinitrc and uncomment the lines mentioned above.
OS X
Recent versions of OS X (10.5 “Leopard” or later) have ssh-agent integration built in – and integrated with the system keychain for passphrase management. See this blog post for details.
On older versions of OS X, install SSH Agent 1.1 or SSHKeyChain and set it to Open at Login or use the same commands as on Linux.

If you have this set up, then you can easily make bookmarks/profiles in iTerm (older OSX) / iTerm2 (newer OSX) to access machines and forward the ssh-agent. An example with some of the LOFAR machines is shown in the image below.

Windows
Windows users that have downloaded the Putty package (see above) and have keys generated and saved on their system can use the Pageant program in the Putty distribution.
To use it, select Programs → Putty → Pageant. Pageant will start as an icon in your taskbar. The icon is this: ![]()
Double-click the icon to open the console. Then use the Add Key button to select the Private key file on your system. You will be asked to enter the passphrase.
Once you have done this, Pageant will be used to forward the keys to any system you have access to, and on which you have added the public key in the $HOME/.ssh/authorized_keys file.
To enable forwarding of your key in Putty, make sure that the session you use in Putty has the option 'Agent Forwarding' enabled and the location of the key file filled in the Connection/SSH/Auth section (see screenshot below).

SSH Port forwarding / tunneling
With port forwarding it is possible to, e.g., copy data with scp from a host that is not directly reachable by your local system. For instance, if you want to copy data from one of the cluster node systems to your local host, you first have to pass the data to the portal.lofar.eu, as you can only access that system directly from the outside world. However, data space is not available on that system, so you are stuck…at least you think so..!
The solution is available and it uses port forwarding, or ssh tunneling.
First, set up the connection. Say, you want to set up a tunnel to lce019 through lofar.portal.eu. Of course, for this to work, you need an account on both systems.
> ssh -L 10000:lce019.offline.lofar:22 -l <username> portal.lofar.eu
In this example, we use the local port 10000, but this could be any portnumber above 1024, as long as it is not used/claimed by another process. The portnumber 22 is the default ssh port that you will use for scp.
You are probably asked to provide a password; this is the password for the portal.lofar.eu, and after providing it you will have logged into the portal. Leave this session open, as it defines the tunnel you use. You have now set up your tunnel.
To use the tunnel with scp, you can give the following commands. To copy files from your local system to the lce019 you type:
> scp -P 10000 <localfile> localhost:<remotefile>
You will be asked for a password. A way to prevent this is to combine these commands with ssh-agent forwarding; see above.
And to copy files from the remote host to your local host:
> scp -P 10000 localhost:<remotefile> <localfile>
After you have finished, you can close the session that defined the tunnel.
Automating the port forwarding hassle
Sounds pretty difficult and scary, all this port forwarding stuff. It's very likely that you had to read and re-read these instructions until you finally got things working. So, you might wonder, whether things could be simplified. Ideally, you would like to be able to simply type:
scp <local-file> [<user>]@<remote-host>:[<remote-file>]
as if you were doing an ordinary secure copy.
Also, you would probably like to be able to ssh directly into the remote system behind the firewall from your Linux box:
ssh lfe001
Can this be done?
Yes, this can be done! And it's very easy to setup. For example, assume you want to have access to the hosts kis001 and lfe001, and the LCUs on the Remote LOFAR stations, all behind the LOFAR portal. All you have to do is add the following lines to your ~/.ssh/config file:
Host kis001 lfe001 RS???C
  ProxyCommand ssh portal.lofar.eu netcat -w2 %h %p
The real workhorse here is netcat, which, started at the portal, simply pipes data from your local machine to the remote machine and vice versa. No need to bind local ports to remote ports! Just ssh or scp to the remote host as if it were in your local network. The -w2 option avoids leaving orphaned netcat processes running on the remote host when the ssh session is closed improperly.
NOTE: Copying large datasets produces a significant load on the portal, which is already overstretched; please try to do that kind of data transfer outside of office hours as much as possible!
Read more about the Transparent Multi-hop SSH
Setup tunneling with PuTTY and winscp
PuTTY is the above-mentioned windows tool that allows you to set up ssh connections to remote systems. You can also use PuTTY to set up ssh tunnels.
In the main screen, provide portal.lofar.eu as host name. Then, in the ssh section, select Tunnels. In the Source Port type in 10000 (or, as mentioned, another local portnumber above 1024). In the Destination type: lce019.offline.lofar:22. Then press the Add button so it shows in the list (See figure for where to fill in what).

Now save this session before pressing Open in the main Session menu. If you now press open, you have defined the tunnel. Depending on whether you have also enabled Agent forwarding (see above), you will have to enter a password or not.
To copy data to and from your Windows system, use the WinSCP tool. Define a new connection in WinSCP to localhost:10000, and you will be able to browse your directories on the lce019 system and get/put files. See the figure for what to fill in where in the new connection window of winscp. Optionally, you can provide a user name/password here, or the private key file to enable Agent forwarding.

How to fix ssh timeout problems
If you use ssh a lot, you may have noticed that your ssh session times out and you’re logged out every once in a while. Annoying isn’t it?
 Read from remote host xxxxxx: Connection reset by peer
 Connection to ocaoimh.ie closed.
There’s a quick fix for that. Actually, there are 2 ways to fix it. You only need to do one of them so choose whichever one is easiest for you. You’ll need root access, so for most people it’s probably safer to do the client fix rather than the server fix.
server side
On the server, login as root and edit /etc/ssh/sshd_config and add the line:
ClientAliveInterval 60
According to man sshd_config, this line: Sets a timeout interval in seconds after which if no data has been received from the client, sshd(8) will send a message through the encrypted channel to request a response from the client. The default is 0, indicating that these messages will not be sent to the client. This option applies to protocol version 2 only. Don’t forget to restart sshd on the server after you save the file.
client side
The other way, and easier and safer way is for your desktop machine to send those keep alive messages. As root on your desktop (or client) machine, edit /etc/ssh/ssh_config and add the line:
ServerAliveInterval 60
That will send send a message to the server every 60 seconds, keeping the connection open. I prefer this way because I login to several machines every day, and I don’t have root access to all of them.
lofarsys@localhost
When you need to become lofarsys on the current host, you can use the following trick to overcome host key conflics:
alias lof='ssh -XA -o NoHostAuthenticationForLocalhost=yes lofarsys@localhost'
Simple VPN using dynamic port forwarding
Instead of forwarding a single port you can also use dynamic port forwarding. This will turn your SSH client into a local SOCKS proxy server. This is quite powerful as all client programs that are then configured to use the SOCKS proxy, will have access to services in the remote network over the encrypted ssh connection. When SOCKS5 is used, also DNS lookups can be sent through your tunnel, basically turning your SSH connection into a poor man's VPN connection.
The most useful application is to use a SOCKS proxy to access LOFAR web services that are behind the firewall (when you are not connected to the LAN). Two steps are needed:
- Create a SOCKS proxy to the LOFAR portal
- Configure your browser (or OS) to use the proxy
Below a description on how to do that.
Create SOCKS proxy
With SSH
The SOCKS proxy is created by enabling the dynamic port forwarding feature when connecting to the LOFAR portal:
ssh -D 1080 <user>@portal.lofar.eu
Port 1080 is the default SOCKS port but you can also choose another non-privileged one (e.g. 9999). Some client programs however may expect that port 1080 is used.
Additionally you may add the '-C' flag to enable compression. This will speed up your connection in most cases except when dealing with a lot of binary data.
With PuTTY
Create a new session in the Putty configuration dialog to portal.lofar.eu on port 22 as you would normally do (e.g. adding your ssh key for authentication).
Then go to Connections→SSH→Tunnels and enable the 'Auto' and 'Dynamic' radio buttons. Fill in 1080 as the source port and click on 'Add'. It should now look like this:

Go back to the Session and save this configuration under an existing or new session.
Configuring your web browser
A web browser must be configured to use the SOCKS tunnel as a proxy server. Generally this is done by going to the web browser settings and looking for something like 'network' or 'proxy' settings:
Firefox
- Go to Preferences
- Look for an item called 'Network proxy'. You may also type 'proxy' in the search field to find it for you.
- Click on Settings, choose “Manual proxy configuration” and fill in the details as below (socks host and port, SOCKSv5, proxy DNS):
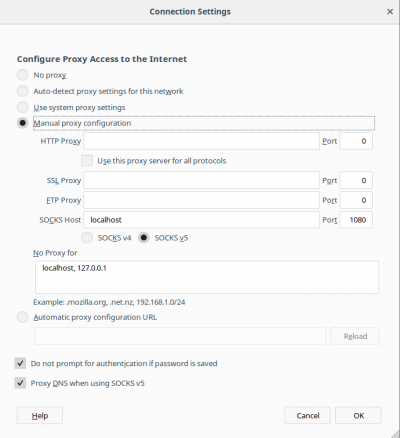
Make sure that DNS is forwarded using SOCKS5 by checking the checkbox. - Now try to access an internal web service, you should be able to use the internal domain name of the service (xxx.control.lofar).

Chrome
Newer versions of chrome use the system-wide network configuration for its proxy settings. This is an alternative to only configuring the web browser to use the proxy. However, if you want to limit the proxy only for web browsing you can start Chrome adding the flag –proxy-server, e.g. on Linux Mint:
google-chrome-stable --proxy-server="socks5://localhost:1080"